HTC is one of the major (proper) Android devices with less support (Dedicated programs) service tools whereas, fastboot method of flashing via Command Prompt or Terminal (Linux/OSX PCs) is a unified method of servicing all Android devices.
Here, we will discuss in detail, how to flash HTC Android devices either in full (Whole ROM) or part(s) (partition by partition) using the fastboot method.
How to Flash HTC Android Devices
Before you flash an HTC Android device using fastboot method via Command Prompt, you need to make sure that;
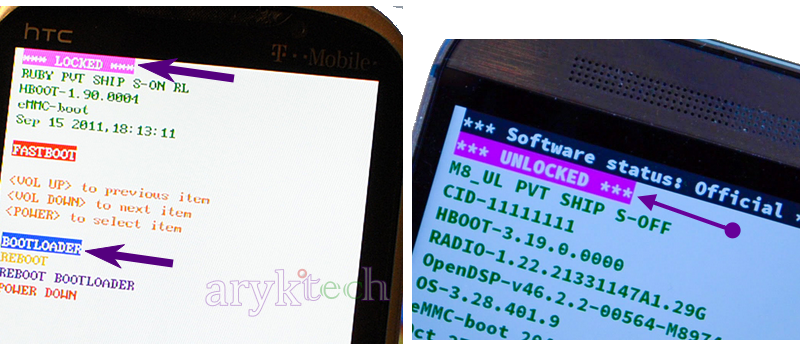
1. The Device Has Unlocked Bootloader: bootloader is usually locked from factory to prevent unsigned partitions and other unauthorized files/access to the Android device. Unless the bootloader is unlocked, flashing will not succeed especially with custom ROM.

In essence, you must Unlock the Bootloader of any HTC Android device before flashing the device if the bootloader is locked. Learn How to Unlock HTC Device Bootloader Here
2. Confirm the HTC Device CID Num: CID Num means Carrier Identification Number. HTC assigns specific code for each carrier for which HTC Android devices are being made for. Thus when you see the CID Num of an HTC device, you can easily identify which carrier the device is particularly made for hence, know the particular ROM or RUU (ROM Update Utility) to be used for the device.

-
Example:
HTC CID Num for ATT devices is XXXX when CID Num for Sprint devices is YYYY whereas for Verizon, it is ZZZZ.
See here:
Full List of HTC Devices CID Num for All Carriers
How to Check HTC Devices CID Num
3. Be Sure the Device is Either S-On or S-Off: the "S" in the "S-On, S-Off" denotes "Security or Secure" and it is usually referred to as Secu-flag or Secure-flag.
Unlike HTC Android devices with S-On, HTC android devices with S-Off are quiet easy to flash because they accept any RUU or partition files, either signed or not.

S-On / S-Off is a security measure put on HTC android devices. This secure token checks to make sure that any .img (partition files) like recovery, kernel, radio and any other partitions of the HTC android to be loaded on any particular HTC android device are actually signed by HTC. This security measure is active only when the HTC android device is S-On and becomes inactive if the phone is S-Off.
4. Be Sure of the Code Name / Model ID: in some cases, there could be little hardware differences in HTC of the same model made for different carriers.
As in the case of HTC One X, one is Envita (ATT Model) while another is Endeavour_ru (International model). They are both the same model with the same look and feel but little hardware differences.
Though they are both the same model, one's RUU cannot be used to flash the other.
Step By Step Guides Involved In Flashing HTC Android Devices: RUU Method
1. Download the HTC Android Device RUU (ROM Update Utility) from either of the links listed below:
2. Download and Install HTC Android device drivers on your PC.
You may download HTC Android device drivers from here
3. Boot the HTC Android device to bootloader.
If the HTC device is still working fine, you may simply enable USB Debugging and or Developer Options on the device.
Quick Note:
a. To Boot HTC Device to Bootloader: first, power off the phone or remove the battery from it, then press and hold both Power + Volume Down (-) buttons together until a screen shows up and then; tap the Power Button once.
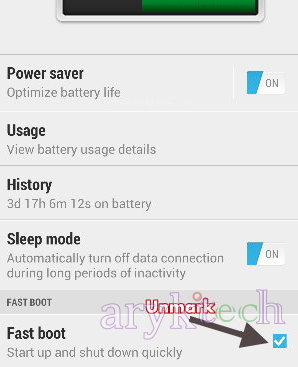
b. If the device turns ON thus; boots to android (normal android mode in functional state) instead of HBoot mode, then you need to disable Fastboot option on the phone.

c. To Enable USB Debugging, see here: How to Enable USB Debugging On All Android Devices
4. Connect the HTC Device to the PC: once connected, wait few seconds while Windows detects and installs the necessary drivers required to communicate with the phone on the PC.
5. Launch the RUU You Downloaded: to flash an HTC Android device using RUU (ROM Update Utility) is as simple as installing a program on your PC. Locate the folder where you have downloaded the RUU for the HTC Android device you wish to flash and then, double-click it and wait few seconds for the RUU to initialize and open.
Once the RUU GUI appears, you may follow the on-screen instructions from the utility until the flashing operation is completed.
Quick Note:
a. This process will erase all the contents of your phone including pictures, music, videos and all other files. If your phone was rooted prior to this, the root access will also be lost and custom recovery will also be replaced with stock recovery, so, if you need to backup any file on the phone; do it while you still can.
b. Your phone's battery must be at least, 70% charged otherwise; the RUU will not flash the phone, instead, you will be asked to charge the battery.
Step By Step Guides Involved In Flashing HTC Android Devices: Custom ROM Method
1. Unlock the device bootloader: if you have not unlocked the device bootloader yet, simply follow the instructions here to unlock the HTC device bootloader.
2. Flash custom recovery on the device: if you already have a custom recovery for the device, flash the recovery on it otherwise, download a custom recovery specific for the device and flash it on it.
See here:
a. How to Flash Custom Recovery On HTC Android Devices
3. Download the Device Custom ROM: there are many custom ROMs available for virtually every android device especially; android devices from popular brands like HTC.
You may check AOKP ROM, MIUI ROM.
If your phone's ROM is not found in any of the list, you may Goggle Search your phone's ROM. Putting "Custom ROM for HTC One M8 your phone's model" should bring desired results for you.
4. Transfer the Downloaded ROM onto the Phone: if the phone uses external SD Card, transfer the downloaded ROM onto the SD Card otherwise, see here on How to Use the Phone's Inbuilt Memory As An SD Card for ROM Installation
5. Boot the Phone to Recovery Mode: to boot your HTC Android device to recovery mode, first, Power off or remove battery from the phone then, press and hold the Power + the Volume Down (-) buttons together until a screen shows up.
Using the Volume Up and Volume Down keys, navigate to the Recovery option and then; select it. The phone should now boot to the recovery.
Quick Note:
Use the Volume Up to navigate up, Volume Down to navigate down and Power Key to select.
6. Wipe Data or Factory Reset the Phone: from the recovery screen (GUI), navigate to Data Wipe/Factory Reset and select it. Confirm the action by navigating to "Yes" then; Wait few seconds for the Data Wipe/Factory Reset process to complete.
Quick Note:
The process differs from one custom recovery to another. But it is generally simple to locate the Data Wipe options.
7. Install the ROM: choose Install ZIP and navigate to the ROM you have downloaded or copied onto the phone and select it. Confirm your selection again for the flashing operation to commence.
This operation may take a while depending on the size of the ROM and the speed of the HTC device you are flashing. You just have to exercise some patience while the the flashing is being done.
8. once the flashing operation is successfully completed, you can then reboot the phone and enjoy.
Quick Note:
S-On HTC devices will hang on boot/bootanimation at the first reboot after flashing. See the instructions below on how to correct the error.
How to Correct HTC Devices Hang-on-boot Due to S-On
1. Ensure that the device bootloader is unlocked.
2. Extract the custom ROM that was flashed on the device onto a folder on your PC.

3. Download Stripped ADB and Fastboot Tools from here and extract it onto a folder on your PC.
4. Copy the boot.img file from the custom ROM folder in step 2 above and place/paste it in the Stripped ADB and Fastboot Tools folder.
5. Now, flash the custom ROM on the device again. See the Step By Step Guides Involved In Flashing Custom ROM On HTC Android Devices here again.
This time, DO NOT REBOOT the device after flashing!
6. Now open Stripped ADB and Fastboot Tools folder and launch Command Prompt from there. To do this: while in the Stripped ADB and Fastboot Tools folder, press and hold the Shift + Right-click keys, then select Open command prompt here from the options that appear.
7. Boot the device to bootloader mode by anymeans known to you. Then, connect the device to the PC and hold on while Windows installs the necessary drivers.
8. Now, go to the Command Prompt window opened in step 6 above and flash the boot.img on the device using the command line given below.
[ fastboot devices]and press enter key.
[fastboot flash boot boot.img]and press enter key.
Wait few seconds or until the boot file is flashed on the device then type:
[fastboot reboot]
9. Now, the device should boot up fully without any delays or errors. NOTE: first boot after flash usually takes around 5 - 15 minutes depending on the device speed.
Flash GApps (Google Apps) On the Device
Although, all custom ROM can run fully independently without the GApps, you may be required to flash the GApps on the device so that all Google Apps and other Android native apps may run and function properly as supposed on the device.
For detailed info about GApps and how to flash it, see here: GApps: Need for it and How to Flash it


0 Comments